


[Aug-2021] VCAP-NV Deploy 2020 3V0-643 Exam Practice Dumps
2021 3V0-643 Premium Files Test pdf - Free Dumps Collection
NEW QUESTION 11
You have been tasked with enabling syslog on the NSX Manager (nsmgr-01a.corp.local) and all NSX Controllers.
Requirements:
vCenter: vcsa-01a.crop.local
NSX Manager A: nsxmgr-01a.corp.local
Password: VMware1!
Syslog Information:
Server: 192.168.110.24
Port: 514
Protocol: UDP
Header Information:
Authentication: Basic
Content-Type: application/xml
Enable syslog for NSX Manager.
Enable syslog for NSX controllers.
HOL LAB for Practice:
See the explanation part for complete solution.
Answer:
Explanation:
SOLUTION:

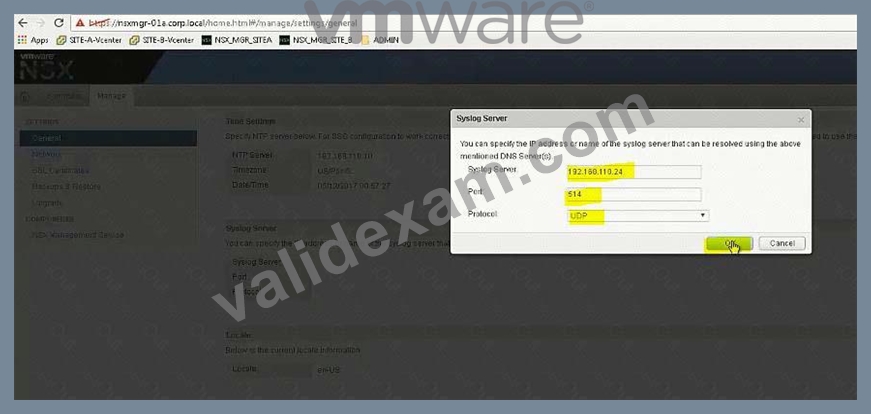

Open API guide from desktop, scroll down for Controller Syslog URI.
In exam search function doesn't work so you should be familiar with the document.
In exam, user hostname instead of IP address (IP address wont work).
For version (2.0), also check API guide version, it could be 2.1 or 2.0 GET
https:// nsxmgr-01a.corp.local/api/2.0/vdn/controller/controller-1/syslog

Copy the required parameters from API guide or memorize.


Verify
Do the same for controller-2
Do the same for controller-3
NEW QUESTION 12
The security team has requested that [email protected] have the ability to fully manage NSX Manager (192.168.210.15) for Site B.
Requirements:
vCenter: vcsa-01b.corp.local
Credentials: [email protected] / VMware1!
Ensure [email protected] has the ability to fully manage NSX Manager in SiteB.
NOTE:
You may have to log out of the web client and back in for 192.168.210.15 to show in web client.
HOL LAB for Practice:
See the explanation part for complete solution.
Answer:
Explanation:
SOLUTION:
NSX Manager in SiteB
[email protected]

go to Nsx manager - b. select Manage Vcenter registration. check if lookup service is configured if not configured it will the details.
lookup service ip = Nsx Manager - a IP Address
Lookup service port = 7444
Lookup service= https://192.168.110.15:7444/lookupservice/sdk
SSO administrator = [email protected]
password = VMware1!
click on ok. click on yes.
NOTE: it will show u connected. if not connected. logout and login again
NEW QUESTION 13
Build a multi-tier network capable of supporting application virtual machines deployed across multiple vCenter instances.
Requirements:
vCenter: vcsa-01a.corp.local
Credentials: [email protected] / VMware1!
Resource Pools: Management and Edge Cluster 1A
The underlying physical network does not support multicast.
All new items created must have a prefix of "U" followed by their function name and a suffix of "New".
i.e. U-App-Tier-NEW.
Create a LS for HA management interface calle U-HA-VXLAN=NEW but do not enable HA on any of the edge devices deployed.
Deploy logical switches using separate subnets for the three tier application shared by both NSX Manager instances.
Deploy the required east-west routing component used across multiple vCenter instances for the multi-tier network.
Utilize a default gateway up to the Perimeter-Gateway02 (tenant router) from the east/west router.
Utilize a static route from the tenant router to reach the three tiers of the application.
Subnets for the tiers:
172.7.10.0/24 for the Web Tier.
172.17.20.1/24 for the App Tier.
172.17.30.0/24 for the Database Teir.
Use the first available IP address for the router on each of the tiers.
Subnet for the Transit VXLAN uplink from the application tier routing to the tenant router.
192.168.190.0/29
Uplink IP address of the application tier should be the first available IP address.
Downlink from the tenant router will use the second available IP addresses.
The password for new edge device(s) must be VMware1!VMware1!
Add all virtual machines with a prefix "universal-" to their respective segments.
Ensure all LIFs are reachable from ControlCenter.
HOL LAB for Practice:
See the explanation part for complete solution.
Answer:
Explanation:
SOLUTION:
universal transport zone
logical switches
U-HA-VXLAN-NEW
U-Transit-NEW
U-Web-Tier-NEW
U-App-Tier-New
U-DB-Tier-New
New DLR U-DLR-NEW
HA Interface - U-HA-VXLAN-NEW
Interface below
- U-Transit-NEW uplink 192.168.190.1
- U-Web-Tier-NEW internal 172.17.10.1
- U-App-Tier-NEW internal 172.17.20.1
- U-Db-Tier-NEW internal 172.17.30.1
Gateway
-U-Transit-NEW
Ip 192.168.190.2
PGW02 vnic4 U-Transit-NEW 192.168.190.2


Create 5 logical switches
U-Transit-NEW
U-Web-Tier-NEW
U-App-Tier-NEW

U-DB-Tier-NEW
Add VMs to relevant newly created Logical Switches.


No need


Create new Universal Logical (Distributed) Router:
U-DLR-NEW


U-Uplink-NEW(U-Transit-NEW)
Select U-Transit-NEW logical swicth here


Perimeter-Gateway-02

To-Universal-DLR
Select U-Transit-NEW


172.17.0.0/16
192.168.190.1
To-Universal-DLR
NEW QUESTION 14
The security team has submitted two requests to change or limit access in NSX for Site A's vCenter groups.
Requirements:
NSX Manager: nsxmgr-01a.corp.local
vCenter: vcsa-01a.corp.local
Credentials: [email protected] / VMware1!
Grant all members of vCenter group AuditTeam the minimal access necessary to view NSX Data Security policy configurations for all objects in Site A.
Grant all members of vCenter group ScanTeam the minimal access necessary to enable them to start and stop data security scans in Site A.
Ensure that the principles of least privilege are adhered to.
NOTE:
The Active Directory groups associated with the vCenter groups has already been preconfigured.
HOL LAB for Practice:
See the explanation part for complete solution.
Answer:
Explanation:
SOLUTION:
select Home. select administrator. select domain vsphere.local. select groups.
click + sign. enter group name AuditTeam click ok. do same for ScanTeam.

[email protected]


[email protected]


select datacenter A.
select manage select permission click on + Sign.
select Assign role read only. select all privileges click on Add
select AuditTeam and select ScanTeam. check propagate to childern. and click ok
NEW QUESTION 15
The troubleshooting NSX deployment is growing and running out of compute capacity. An additional ESXi host is being added for VXLAN.
Host preparation has failed on esx-05a.corp.local on several attempts and the Compute Cluster 2A was left in an error state, determine and resolve the issue.
Requirements:
vCenter: vcsa-01a.corp.local
Credentials: [email protected] / VMware1!
Cluster: Compute Cluster 2A
IP Pool: Compute-2A
Transport Zone: Local-Transport-Zone-A
Esx-05a.corp.local IP information:
IP: 192.168.110.58
Netmask: 255.255.255.0
Gateway: 192.168.110.1
DNS: 192.168.110.10
1-Resolve deployment issue.
2-Prepare esx-05-a.corp.local for NSX in Compute Cluster 2A.
3-Ensure once the issue is resolved with the Compute Cluster 2A cluster, that it is connected to Local-Transport-Zone-A.
HOL LAB for Practice:
No Lab Module available
See the explanation part for complete solution.
Answer:
Explanation:
SOLUTION:
Follow the steps as:


NEW QUESTION 16 
Questions HOL LAB Modules and Pages for practice
1
http://docs.hol.vmware.com/hol-isim/HOL-2019/hol-1903-01-nsxinstall-p1.htm HOL-1903-01 Page 16 or you can directly Open a NSX manager in the lab and edit the existing settings bOpen PSC and NSX manager in HOL-1903-01 and look for NTP Server loand cation cExport existing vDS config and Import back the config for practice in HOL-1903-01 dNo Lab Module available
2
http://docs.hol.vmware.com/hol-isim/HOL-2019/hol-1903-01-nsxinstall-p2.htm and LAB - HOL 1903-01 Page 26-36
3LAB - HOL 1903-01 Module 2 - Page 37-38
4LAB - HOL 1903-01 Module 4 - Practice and understand whole module Bridging and other questions 7,
8, 9 and LAB - HOL-1925-02 Module 1
5LAB - HOL 1903-01 Module 4 - shows how to deploy NSX Edge, you can also deploy Distributed logical router DLR in the same way the lab.
6LAB - HOL 1903-01 Module 3 - Practice and understand the whole module, it will be use full for other question like 20 and 22
7LAB - HOL 1903-01 Module 4 - Practice and understand whole module Bridging and other questions 7,
8, 9
8LAB - HOL 1903-01 Module 4 - Practice and understand whole module Bridging and other questions 7,
8, 9
9LAB - HOL 1903-01 Module 4 - Practice and understand whole module Bridging and other questions 7,
8, 9
10LAB - HOL-1903-02 Module 1 and 2
11LAB - HOL-1903-02 Module 1 and 2
12LAB - HOL-1903-02 directly follow the steps in this document for practice
13LAB - HOL 1903-01 - open an NSX manager in LAB and directly follow the steps in this document.
14LAB - HOL 1903-01 - open postman in the lab and directly follow the steps in this document.
15LAB - HOL 1903-01 - directly follow the steps in this document for practice.
16LAB - HOL 1903-01 - directly follow the steps in this document for practice.
17LAB - HOL-1925-02 Module 1
18LAB - HOL-1925-02 Module 1
19 LAB - HOL-1925-02 - directly follow the steps in this document for practice.
20LAB - HOL 1903-01 Module 3 - Practice and understand the whole module.
21No Lab Module available
22LAB - HOL 1903-01 Module 3 - Practice and understand the whole module.
23LAB - HOL 1903-01 - open postman in the lab and directly follow the steps in this document.
(Exam Topic 1)
Two administrators (John and Chris) share admin responsibilities for an NSX deployment that is leveraging Centralized CLI as part of their management. Security requirements prohibit use of shared admin accounts in Site A.
Requirements:
NSX Manager: nsxmgr-01a.crop.local
New administrator accounts: "John" and "Chris"
Default password: VMware1!
Create accounts for John and Chris.
Use one of the newly created accounts to display all clusters enabled for the distributed firewall.
Use Putty's "Copy All to Clipboard" feature to paste the command and output to a text file dfw-NEW.txt on the ControlCenter desktop.
NOTE:
Screenshot is shown on how to use Putty's Copy all to Clipboard feature.
HOL LAB for Practice:
See the explanation part for complete solution.
Answer:
Explanation:
SOLUTION:
13:(1) select vccenter - a. select datacenter A and click right mouse button select administrator. select user and groups click on + sign. select user tab enter user name john password VMware1!. click ok . do same for chris.
(2) select datacenter A.
select manage tab. select permission. click + Sign. select Read Only from Assign Role. select All Privileges click on Add. select John and chris.checked Propagate to childern and click on OK.
(3) go NsX Manager. select Nsx Manage-a. select manage select user from tab. click + sign. select identity user. check specify vcenter user. enter user name [email protected] click next. select role Nsx Administrator. click finish. do same for chris. but use [email protected] and assign role of NsX administrator click finish.
6 of 336
Enable
VMware1!
Conf t
User john password plaintext VMware1!
User chris password plaintext VMWare1!
Exit
Write memory
Open new Putty session or Duplicate Session:
john
VMware1!
Show dfw cluster all

Ctrl+V don't work in exam.


NEW QUESTION 17
Configure the Layer 3 connectivity between the newly created Dev-segments by assigning them to a new DLR named Dev-DLR-NEW.
Requirements:
vCenter: vcsa-01a.corp.local
Ccredentials: [email protected] . VMware1!
Default GW for Dev-subnets:
Dev-Web-Tier-01-NEW172.16.10.1/24
Dev-App-Tier-01-NEW172.16.20.1/24
Dev-DB-Tier-01-NEW172.16.30.1/24
DLR Settings:
DLR Name: Dev-DLR-NEW
Uplink IP Address: 192.168.6.5/30
Interface: Dev-Transit
Password: VMware1!WMware1!
Cluster: Management & Edge Cluster
Ensure east-west routing has been optimized.
The control plane failover should begin 15 seconds on logical switch HA-VXLAN.
Ensure secure shell is available.
Connect the Web, App and DB virtual machines to their respective dev tiers.
Dev-web-01, Dev-web-02a, Dev-web-04a
Dev-app-01a
Dev-db-01a
HOL LAB for Practice:
also deploy Distributed logical router DLR in the same way the lab.
See the explanation part for complete solution.
Answer:
Explanation:
SOLUTION:
Add VMs to respective Logical Switches:


No need for below
To change the control plane failover within 15 seconds use the RESTClient as shown below or the Postman application in Chrome.
Open Firefox
Open RESTClient from Firefox
Authentication
Basic Authenticaion
Admin
VMware1!
Headers
Custom Headers
Content-Type
Application/xml

Note down the edge id of newly created DLR (in exam its edge-12)
There will be a NSX API guide on desktop and look for "declaredeadtime".
Or memorize below string:
URL: https://192.168.110.15/api/4.0/edges/edge-10/highavailability/config Note: in exam its edge-12 but make sure!

Change the value to 15
Body:
<highAvailability>
<declareDeadTime>15</declareDeadTime>
</highAvailability>

NEW QUESTION 18
Management has approved an expansion of the virtual infrastructure. You have been tasked to prepare Cross vCenter configuration with the second vCenter Server. Another administrator has provided a pre-configured vDS configuration file located on the Control Center Server. All identifiers must be maintained.
Requirements:
vCenterB server: vcsa-01b.corp.local
Credentials: [email protected] / VMware1!
vCenterB VAMI Credentials: root / VMware1!
Cluster: Computer Cluster 1B
ESXI Hosts: esx-01b.corp.local, esx-02.corp.local
Platform service controller: psc-01a.corp.local(192.168.110.9)
NSX Manager: nsmgr-01b.corp.local (192.168.210.15)
Credentials: admin / VMware1!
Time Zone: US/Pacific
*Configure nsmgr-01b.corp.local for vCenterB and psc-01a.corp.local
*Ensure nsxmgr-01b.corp.local uses the same NTP server as psc-01a.corp.local with a US/Pacific TimeZone.
*Import the new vDS configuration vds-site-b-Compute-New.zip
All identifiers must be maintained.
*Assign the remaining two used vmnics for the ESXi hosts to the newly imported vDS.
NOTE:
Do not migrate VMkernels from the standard switches on the hosts.
HOL LAB for Practice:
a http://docs.hol.vmware.com/hol-isim/HOL-2019/hol-1903-01-nsxinstall-p1.htm HOL-1903-01 Page 16 or you can directly Open a NSX manager in the lab and edit the existing settings bOpen PSC and NSX manager in HOL-1903-01 and look for NTP Server loand cation cExport existing vDS config and Import back the config for practice in HOL-1903-01 dNo Lab Module available See the explanation part for complete solution.
Answer:
Explanation:
SOLUTION:
Step 1: Login to PSC using VAMI credentials and note down the time zone and server details and use the same in SiteB NSX Manager time settings.
Step 2: Update the time settings, complete lookup service configuration, associate SiteB NSX manager to SiteB vCenter. Check the status from SiteA vCenter Webclient -> Networking & Security -> Installation -> Management.
Step 3: Import the Distributed switch to Cluster B, add the hosts & assign the interfaces.
Login to https://psc-01a.corp.local:5480/ to check the NTP server details and note it down. Use the VAMI credentials given to login. Need to click on Edit to see the server details in here as it is not showing up in the main page (In exam, it is showing in the main page itself).


Important NOTE:
In exam change Lookup Service Port according to NSX Manager of Site A which is working one.
It's 7444 in exam.


Click refresh if in case it shows as disconnected.
Login to SiteA vCenter using Web Client and confirm the status of both the NSX Managers: Installation -> Management.


NEW QUESTION 19
An NSX administrator has been troubleshooting a communication issue between Edge device TS-Comm-Edge-01 and the TS-Comm-DLR-01 logical router with no success and has reached out to you for further assistance. The following troubleshooting has already been performed.
Temporarily disabled the firewall between both devices.
Unsuccessful ping from TS-Comm-Edge-01 to TS-Comm-DLR-01
Unsuccessful ping from TS-Comm-DLR-01 to TS-Comm-Edge-01
Determine and resolve the communication issue between the two devices.
Requirements:
vCenter: vcsa01a.crop.local
Credentials: [email protected] / VMware1!
Troubleshooting Information:
Edge: TS-Comm-Edge-01 (192.168.33.1)
DLR: TS-Comm-DLR-01 (192.168.33.8)
Transit Network: TS-Comm-Transit
IP Subnet: 192.168.33.0/29
Ensure communication between both devices is successful.
NOTE:
IP addresses must remain unchanged.
HOL LAB for Practice:
See the explanation part for complete solution.
Answer:
Explanation:
SOLUTION:
Troubleshooting:
TS-Comm-Edge-01
Interfaces -> TS-Comm-Transit (change the subnet mask to 28)
Verification:
SSH to TS-Comm-Edge-01 (192.168.7.2) and ping 192.168.33.8


(2) select Ts-Comm-DLR-01 from Nsx Edge. select Manage tab. select Settings.
select interface. check the ip address and mask. and change the mask to /28.
click ok.
(3) select Manage Tab. select Routing. select global configuration. click edit.
select OSPF enter router ID 192.168.33.8 click ok. click on enable
click on publish changes.
(4) select OSPF. click edit. enable OSPF. Enter Protocol Address 192.168.33.7 enter forwarding address 192.168.33.8 (ip address of the vnic). click enable graceful restart. click ok.
(5) under area. click + Sign and add area 0. select type normal. select authentication none. click ok.
(6) under area to interface mapping. click on + sign. select interface uplink enter area 0. enter hello interval 10. dear interval 40. enter priority 128 enter cost 1. click ok. click publish changes.
(7) select TS-Comm-Edge-01. select manage select routing. select global configuration.
click edit under dynamic routing configuration.enter router id ts-comm 192.168.33.
click ok. click publish changes.
(8) select OSPF. click edit. enable OSPF. enable graceful restart. click ok.
select vnic transit. enter area 0. click on blue icon. change the subnet mastk to /28. click ok.
(9) select Firewall under manage Tab. click disable. click publish changes.
do the same steps for Ts-comm-DLR-01. and disable the firewall.
NEW QUESTION 20
......
Get ready to pass the 3V0-643 Exam right now using our VCAP-NV Deploy 2020 Exam Package: https://www.validexam.com/3V0-643-latest-dumps.html